Dec 28, 2014 | Uncategorized |

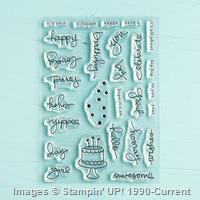
Seasonally Scattered has been the set that I have used the most from the Holiday 2014 catalgue. I love the versatility.
I decided to focus on gold for this card as metallics are so hot right now. In addition to the brushed gold card stock and gold bakers twine, I used gold embossing powder twice on this card.
First I applied an autumn wooden element directly to a VersaMark pad and then dipped it into gold embossing powder. I then heated the powder carefully as it gets hot – to create the leafy accents. And these wooden elements are on sale right now as part of the year end closeouts.
I inked up the image with Old Olive and Crushed Curry inks that I applied with daubers. I sprinkled gold embossing powder randomly on top of the stamped image leaving some empty areas so the stamped image shows through and heat embossed. If is possible to apply embossing powder to any ink if you work quickly. It helps if your ink pad is well inked too.
Many items in the Holiday 2014 catalogue will only be available until January 5th. Take another look and be sure you have everything from your wish list.

Click Here To Order Stampin’ Up in Canada
Product List
Just in Time for Boxing Week!
New Products added to the Year End Closeout

The year end closeout is available until January 5th. Stock up today!
See all the items and start saving with up to 80% off.


Dec 9, 2014 | Uncategorized |

I took a break from Christmas Cards to make a birthday card for my nephew, Nathan.
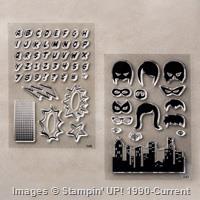
I sure wish there had been a set like Calling All Heroes when my son was younger. How can you go wrong making a card with superheroes for the birthday boy? And to make it even more special, I always try to personalize the card with the child’s name and this set has the full alphabet included.
Designing this card was actually a lot of fun and sort of like doing a puzzle. Pick a face shape and then add the mask and mouth. Next is the word bubble and then the card can be filled in with the building or other accessories. This is a set of 60 (20 images plus the alpha/numbers) so there are lots of combinations for stamping.
Seeing the theme of this card was heroes, choosing Real Red as one of the colors was a given. I added Daffodil Delight and Pacific Point as the other two colors.
This card didn’t need a lot of embellishing but a few Real Red Candy Dots from the Brights collections worked perfectly.
View all of the photopolymer sets and order your favorites today.
Click Here To Order Stampin’ Up in Canada

Dec 5, 2014 | Uncategorized |

New items have been added to the Clearance Rack with savings up to 80% off.
Clearance items include lots of holiday items and are only available while quantities last.
To view the discounted items and to order, click here
Catalog items and other non clearance rack items may be added to the order.

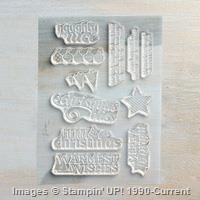
I was attracted to this stamp set, Seasonally Scattered, my very first glance through the Holiday Catalogue. I always look for sets that can be used beyond Christmas like this one. Over the next few days, I’ll share a couple of other samples that can be used for other occasions during the year.
I decided to use the thumping technique for this card. I often fall back to this technique because it’s a fast way to take a stamped image up a notch.
Simply ink up your image – I used Bermuda Bay. Then using the thicker tip of a marker gently tap ink randomly over the ink. It’s best to use markers that are darker in colour than the ink. Repeat with a second marker. For this card I used Lost Lagoon and Island Indigo for a subtle look. Experiment with contrasting colours like I did here on the maple card. Huff on the stamp to re-moisten and stamp as usual.
I added a few Frosted Sequins as an accent and then layered the image on Bermuda Bay and Brushed Silver card stocks to finish.
If you are looking for a stamp set for Christmas and beyond, I recommend Seasonally Scattered, a personal favorite.
Product List

Dec 1, 2014 | Uncategorized |

This card was made with one of my favorite new techniques that includes the Blendabilities markers from Stampin’ Up! And it’s a snap to do.
Simply stamp your image onto dark coloured card stock – here I used Christmas Bauble on Basic Black card stock – and heat emboss with white embossing power.
Then colour over the image with your blendabilities markers. That’s it! Really.
For this card, I used the Cherry Cobbler, Old Olive and Crumb Cake Blendabilities assortments.
Product List
Click Here To Order Stampin’ Up in Canada

Select items and bundles at a 20%-50% discount!
See the pdf list HERE

Want to save even more?
The Stampin’ Up! Starter Kit is 25% off this week only. Includes your choice of $155 in product plus free shipping & gst for only $93.75.
ORDER your starter kit today!

Nov 26, 2014 | Uncategorized |

I love simple, no fuss Christmas cards especially if they feature a metallic colour. This card took almost no time to make and is just gold and white. I love sets that have a greeting for the front as well as the inside and this set definitely works.
Although I plan to use this for my Christmas card this year, I hope to make a few extras and change the greeting to thank you or happy birthday as this set will get me through lots of winter occasions.
I stamped the image onto vellum card stock with gold Encore ink and then heat embossed with gold powder. The layers are Whisper White and Brushed Gold card stocks.
The gold satin ribbon is the only embellishment on the card and is there mostly to hide the mini glue dots holding the vellum to the card.
Since this card is basically just card stock, it will be inexpensive to make a bunch of cards to give out as Christmas Cards this year. And to make it even better, some of these products are on sale this week in silver and gold.

Select items and bundles at a 20%-50% discount!
See the list HERE
Product List
Want to save even more?
The Stampin’ Up! Starter Kit is 25% off this week only. Includes your choice of $155 in product plus free shipping & gst for only $93.75.
ORDER your starter kit today!

Nov 25, 2014 | Uncategorized |

As soon as I saw the Santa Stache stamp set in the 2014 Holiday Catalogue, I knew that mustache needed to spin. See the really easy step by step instructions below.
I really like this set because you can make cards and tags. These two images – santa and nutcracker – just beg to be colored and that’s were the blendabilities are perfect. I have never consider myself much of an artist but these alcohol pens sure make me feel like one.

The glimmer paper I used – silver and gold – are on sale right now along with alot of other great products.
Select items and bundles at a 20%-50% discount!
See the list HERE
Step by Step

Step 1 – punch a 1/2 circle and attach to stamped image with a brad. Center the punch and brad right over the mustache.

Step 2- place a stampin’ dimensional over the brad

Step 3 – adhere a second punched 1/2″ circle over the dimensional

Step 4 – add a few mini glue dots or sticky strip over the punched circle

Step 5 – Adhere the mustache being sure to place it directly over the mustache on the stamped image

Here is a tag version. I think it would make a great ornament as well.

A close view of the spinner stache.
Want to save even more today?
The Stampin’ Up! Starter Kit is 25% off this week only. Includes your choice of $155 in product plus free shipping & gst for only $93.75.
ORDER your starter kit today!
Product List