Sometimes, a stamp set and a background stamp meet and you just know they were made for each other. That’s exactly how I felt when the Painted Stripes background stamp crossed paths with the Delightful Wishes bundle. Add a few blending brushes, some ink in bold happy colors, and a little creative playtime, and suddenly I had three cards that make my heart happy.
These cards all started with the same basic supplies, but each one has its own personality.
Setting the Stage: Supplies and Prep
Before diving into the card-by-card details, here’s what I used for the three cards.
Berry Burst Stampin’ Blend for coloring the Antique Pearls
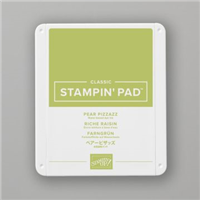
Cardstock and ink in Berry Burst, Lemon Lime Twist, and Bubble Bath
Basic White cardstock
Pro tip: When working with a large background stamp like Painted Stripes, lay the stamp face up and press the cardstock down onto it. It give a more even impression.
Card 1: Berry Burst Blossom Branch
For the first card, I stamped the Painted Stripes background in Bubble Bath ink for a subtle, little less structured option.
The real star here is the branch of blossoms, die-cut from the Delightful Wishes bundle. The branch itself is in Early Espresso, and the flowers are stamped in Berry Burst and Bubble Bath, with small Lemon Lime Twist leaves for contrast.
I placed the “wishing” die-cut sentiment across the bottom, layered in Berry Burst and Bubble Bath, and added the “You a Happy Birthday” greeting. Three custom-colored pearls, colored with the Berry Burst Dark Blends marker, balance the design and draw the eye toward the sentiment.
Small detail, big impact: Using an darker color like Early Espresso for the branch grounds the design and makes the flowers pop.
Card 2: Bold in Lemon Lime
The second card is all about letting one color take the spotlight. Lemon Lime Twist is the star here, paired with crisp Basic White and just a pop of Berry Burst.
I started with the Painted Stripes background stamp again, this time keeping it monochromatic. On the right-hand side of the Basic White panel, I stamped the smaller floral outline from Delightful Wishes in Lemon Lime Twist for a subtle tone-on-tone pattern.
The “wishing” sentiment was die-cut in Bubble Bath and layered over Lemon Lime Twist, giving it a bold shadow effect. “You a Happy Birthday” was stamped in Berry Burst on a narrow die-cut label.
To finish, I added two stamped and die-cut flowers in Berry Burst and Bubble Bath, accented with those same custom-colored pearls.
Tip to steal: I used adhesive sheets on the back of my cardstock before die cutting the “wishing” sentimentd. This turns the die cut into a peel-and-stick sticker, making it so much easier to attach those delicate letters without glue mess or shifting.
Card 3: All the Colors Blended
For this card, I started by inking the Painted Stripes background stamp in Bubble Bath. I used a blending brush to add Berry Burst and Lemon Lime inks to highlight the colors on the square.
Once my striped background was ready, I layered it on Berry Burst cardstock for a bold frame, then added a smaller Basic White panel matted with Lemon Lime Twist.
The flowers were die-cut from the Delightful Wishes bundle. The bottom piece is colored cardstock and the top piece is Basic White colored with ink and Blending Brushes. I love that you can create depth just by blending in shades of the pink and berry. The leafy accents are Lemon Lime Twist — also cardstock and ink layers – bright and cheerful against the pinks.
I finished with the large “wishing” die cut, layered for extra dimension, and the sentiment “You All the Best” stamped in Berry Burst. A few antique pearls, colored with my Berry Burst Stampin’ Blend, tied everything together.
Tip to steal: Coloring pearls with your Stampin’ Blends gives you custom embellishments in any color you need.
Why Painted Stripes and Delightful Wishes Play So Well Together
The Painted Stripes background stamp gives you an instant base for your design. You can make it bold, soft, or multicolored, and it’s always going to add visual interest without overwhelming your focal point. The Delightful Wishes bundle brings in the detail — layered die cuts, mix-and-match florals, and sentiments that work for birthdays, celebrations, and just-because cards.
Together, they’re a match made in crafting heaven. You can easily batch-make a set of cards using this pairing, just by switching up colors and flower arrangements.
Try It Yourself
If you’ve been looking for a way to stretch your background stamps beyond a single look, grab a blending brush and play with layered inking. Pair it with a versatile bundle like Delightful Wishes, and you can create a whole range of cards in one sitting.
Now it’s your turn. Which of these three cards is your favorite? Would you go bold and bright, soft and pretty, or stick with a monochrome look?
Leave me a comment below to share your pick, and be sure to subscribe to my newsletter for more card ideas, tips, and tutorials delivered straight to your inbox.
The most magical time of the year is just around the corner, and if you’re anything like me, you want your holiday crafting game to be strong this year. Whether it’s handmade cards, unique tags, or festive gifts that gets you excited, I’ve got some news that’s going to make your holiday season shine brighter than Rudolph’s nose!
Let’s talk about something fun and oh-so-festive: The 12 Weeks of Christmas, starting October 2!
What is the 12 Weeks of Christmas?
Imagine getting a free, exclusive holiday crafting tutorial delivered to your inbox every single week for the next 12 weeks! Starting October 2, you’ll receive a new project idea, complete with step-by-step instructions, measurements, and a supply list. And it’s totally FREE!
Each tutorial will focus on a different holiday project. Whether you’re into handmade cards, gifts, or more, I’ll be sharing ideas that will keep your craft room bustling with creativity all season long.
There’s something for everyone, and it’s the perfect way to make sure you’re staying on top of your holiday crafting. Because, let’s be real, December sneaks up on us faster than a gingerbread man on a sugar rush.
Why Should You Sign Up?
Here’s the thing—crafting takes time. And if you’re like most of us, you might start out with big plans to handmake everything this holiday season… only to end up frantically buying store-bought cards and pre-made gift tags last minute.
With the 12 Weeks of Christmas, I’ve got your back! Each week, you’ll get a fresh idea that’s designed to be fun, easy, and doable—even if life gets busy. These tutorials are perfect for crafters of all skill levels. Whether you’re a seasoned pro or just getting started, you’ll find tons of inspiration to keep your holidays handmade and heartfelt.
Plus, who doesn’t love the satisfaction of showing off their handcrafted holiday creations? Trust me, your friends and family will be blown away when they see what you’ve made.
Here’s a sneak peek of what you can expect each week:
Card Tutorials: From elegant and classic to cute and whimsical, I’ll be sharing a range of card designs perfect for spreading holiday cheer.
Gift Tags: Dress up your packages with handmade gift tags that’ll make even the simplest present look extra special.
Handmade Gifts: Sometimes the best gifts are the ones you make yourself! I’ll show you how to create thoughtful, handcrafted presents that your loved ones will cherish.
Each project comes with:
Step-by-step instructions: No need to guess what to do next! Every tutorial is broken down into simple steps so you can craft with confidence.
Measurements and Supply Lists: No more scrambling to figure out what you need. I’ve got all the details sorted out for you.
Tips and Tricks: I’ll be sharing my favorite hacks to make your crafting process smoother and more fun!
Why Start on October 2?
Starting early means you’ll have plenty of time to get creative and avoid the last-minute rush. By the time December rolls around, you’ll already have a stash of handmade goodies ready to go!
Also, let’s be honest—we all need a little extra Christmas spirit this year. And what better way to get into the holiday mood than by spending time each week creating something special? Trust me, the holiday season is a lot more enjoyable when you can slow down and enjoy the process of making something beautiful.
How Do You Sign Up?
It’s super simple! Just enter your email, and you’re all set to start receiving your weekly tutorials. You’ll get your first project delivered to your inbox on October 2, and then every week after that, you’ll get another one. Before you know it, you’ll have 12 fantastic projects under your belt and a head start on your holiday crafting.
And did I mention it’s completely FREE? No hidden costs, no strings attached—just 12 weeks of festive fun, inspiration, and creativity. Plus, you’ll receive my free tutorial, “5 Fun Folds Every Paper Crafter Need to Know!”
Get Ahead: Instead of scrambling at the last minute to make your holiday cards and decorations, you’ll already have a solid start! Think about how nice it’ll be to spend December sipping hot cocoa and enjoying your Christmas tree instead of frantically crafting.
No Stress, Just Fun: With weekly tutorials sent straight to your inbox, you won’t need to scour Pinterest for hours looking for inspiration. It’s all done for you!
Build Your Crafty Confidence: Trying something new can be intimidating, but with clear instructions and easy-to-follow steps, you’ll feel confident tackling any project.
Personal Touch: Handmade projects add a special, personal touch to your holiday season. Whether you’re gifting handmade cards or decorating your home with your own creations, nothing says “thoughtful” like something made from the heart.
What Will You Make First?
From cards to decor to handmade gifts, the possibilities are endless. What I love most about the 12 Weeks of Christmas is that it helps you build excitement for the holidays one project at a time. You’re not just crafting—you’re creating memories and traditions that will last for years to come.
Remember, the fun starts on October 2. Don’t miss out—sign up today and get ready to deck the halls, fill your gift boxes, and spread holiday cheer like never before.
If you’re looking to add a dash of fun to your holiday crafting, the Reindeer Fun Bundle by Stampin’ Up! is your new best friend! Whether you’re making cards, tags, or more, this bundle will have you prancing through your projects.
Now, the bundle is amazing but the Reindeer Days Suite Collections adds a charming paper that centers around—you guessed it—reindeer! Also in the suite are adhesive peppermints, twine and my new fave, the Plaid 3D Embossing Folder. With a mix of playful and classic designs, you can create everything from whimsical holiday cards to sophisticated winter scenes.
View the card tutorial:
Why I Love the Reindeer Days Suite:
Versatile Dies: The coordinating dies make it super easy to cut out those reindeer, along with other pieces like the build a reindeer, wreath and scene stealing greenery frame. No fussy cutting required! (Though if you love fussy cutting, I support you!)
Adorable Reindeer Stamps: The star of the show is the reindeer stamp set, which features various poses of reindeer that are ready to be the focus of your cards and projects! You can stamp the reindeers and bring them to life by coloring them with Stampin’ Blends. Or, use two-step stamping to add accessories.
Cozy, Festive Paper: Don’t forget the patterned paper! The Reindeer Days Suite includes cozy winter patterns in rich colors like soft browns, deep greens, and pops of festive red. Perfect for layering on your cards or cutting out accents.
I love, love, love the way the die cuts layer to build the reindeer. Can you see the whites of the eyes? What a fun feature! And I finished the card with a peppermint nose.
Do you know a coffee lover who thinks every day should start with a little caffeine boost? Or, like me, are you a coffee addict that simply can’t function without that first cup of joe. If so, you’ll want to cozy up with the Latte Love stamp and die bundle!
This adorable collection of stamps is perfect for capturing your love of coffee, whether you’re a die-hard espresso enthusiast, a latte sipper, or someone who enjoys a simple cup of brewed coffee. Imagine making cards that smell like freshly brewed coffee (okay, not really, but the mood is there) with steaming mugs, cute sentiments, and fun coffee-themed images that celebrate our favorite daily ritual.
All of the products in the A Little Latte Suite are adorable and available exclusively online and are not in any catalog.
Measurements:
Early Espresso: 8 1/2” x 5 1/2” for the card base and 1-1/8” x 3-1/8”
Pecan Pie: 4-1/8” x 5-3/8”
Lemon Lolly: 3” x 3”
Basic White: 3-7/8” x 5-1/8” and 1” x 3”
DSP: Lemon Lolly coffee cup
Instructions:
1. Score and fold the Early Espresso card base in half. Adhere the Pecan Pie card stock layer to the card front. With Early Espresso ink, stamp the top view coffee cup image in each corner of the Basic White card stock as well as in the center. Fill in each coffee cup with the feather latte art image in the same color of ink. Adhere to the card front once dry.
2. Cut out a circle from the Lemon Lolly card stock square using the second largest Stylish Shapes die. Add the circle to the card front with adhesive.
3. Stamp the greeting onto the smaller piece of Basic White card stock with Early Espresso ink and trim each edge at an angle. Layer onto the smaller piece of Early Espresso card stock and trim the card stock edges to align with the Basic White. Glue the two pieces together and add to the card with Dimensionals.
4. Cut the Lemon Lolly coffee cup from the DSP and add to the card with additional Dimensionals.
5. To finish the card, add three Adhesive-Backed Swirl Dots as shown./
A quick reminder on the last day of Sale-a-bration. Please keep reading for the Accordion Card Tutorial.
Do you have your free Sale-a-bration items?
SHOP the catalogues, Clearance Rack, prepaid Paper Pumpkin subscriptions and the Kits Collection online and you can earn exclusive items for purchasing products already on your wish list.
Level 1 is free with a $60 purchase pre-tax and shipping. Level 2 items are free with a $120 purchase pre-tax and shipping.
JOIN This is my favourite way for you to save during Sale-a-bration. Until August 31st, you receive the following with your Starter Kit when you join my Dreaming About Rubber Stamps Team:
Your choice of $165 in products
Pay only $135 including GST & Taxes
The Making Plans Collection including the Making Plans Planner, Making Plans Notebook Trio and Making Plans photopolymer stamp set
Want more reasons to join my team during Sale-a-bration?
Your Starter Kit is shipped free and the GST is paid.
You’ll earn a 20% discount on all purchases immediately after joining and for long as you remain an active demonstrator.
Join my team today and you’ll get tons of inspiration from our DARS Team FaceBook group, team swaps and events which share amazing and inspiring projects.
You’ll have no obligation to ever sell or share with anyone and no obligation to buy another thing if you don’t want to.
If you’re ready to join my incredible team, click here.
Accordion Card using the Wonderful World SAB Bundle
The Wonderful World stamp set & DSP Bundle is one of my favourite Sale–a-bration products. And when the stamps and paper coordinate so wonderfully, it’s easy to make card like this fun fold.
Accordion Card Tutorial:
Cut a piece of cardstock 5-1/2″ x 11 for the card base and score at 1-3/4″, 3-1/2″, 5-1/4″ and 7″ along the 11″ side. Cut a second piece of cardstock to 3″ x 6″ for the folded piece and score at 3″.
Cut two pieces of designer series paper that each measure 2-3/4″ x 2-3/4″ as well as two pieces of designer series paper each cut to 1-1/4″ x 5-1/4″.
For the inside of the card, cut a piece of Basic White to 4″ x 5-1/4″.
Stamp a flower onto the Basic White layer for the image inside the card being sure to position it to be hidden when the card is closed. I masked the flower and inked up the stem first. Then I removed the mask and carefully inked up the flower in the darker ink before stamping.
Stamp two greetings and a flower onto a scrap piece of Basic White and cut out with dies or scissors. There is not a matching die for Wonderful World so I fussy cut with Paper Snips.
Assemble the card as shown using Seal to adhere all of the pieces except the greeting and flower on the front which were adhered with Dimensionals.
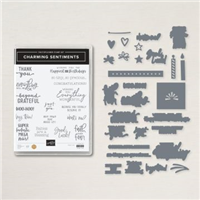
The flower I stamped inside and on the front of this card is the German Cornflower. The Wonderful World stamp set includes images of prominent flowers found around the world.
Included in the set is an English Rose, a pink Campanula or bell flower from the Netherland, a Colombian Cattleya Orchid, a French Iris, a Sri Lankan Blue Lily, a Swiss Edelweiss, a Pakistani Jasmine, a Romanian Dog Rose and a New Zealand Kowhai. Stamp a lovely flower, then add a sentiment from a greeting set like Charming Sentiments. I love that there are matching dies for this greeting set.
This card can be mailed in a Basic White Medium Envelope. When closed, the vibrancy of the Basic White cardstock layer really shows off the rest of the card.
Today is World Card Making Day and here’s a free tutorial to celebrate. This Cutting Edge tutorial shows how cardstock can be cut with to use most of the paper – budget and time friendly. Leave a comment if you have any questions or comments.
Click on the tutorial above or this link to download.
Contct me by phone 780.472.8200 or 780.235.0455 cell
Current Catalogues
Click to view the catalogues.
Search by Category
Search the Archives
The Fine Print
This is the personal blog of Darlene McCallum, an Independent Demonstrator with Stampin’ Up Canada and I am responsible for its content. Stampin’ Up! does not endorse the contents of classes or use of services, or non-Stampin’ Up! products I may offer here.